Fortnightly Payroll
(1) Gross Basis (pay before tax deductions)
or
(2) Net Basis (take home pay)
If you pay your employees a GROSS Wage, then choose one of the following options:
- Process ICON no. 3 or Payslips > Fortnightly Input, or Payslips > Payroll Preview/ Quick Edit
Both entry screens give access to the same information. The Quick Edit option lists the employees in report format, whereby the user can simply select the employee by double clicking on their name from the list and enter the pay details. The Fortnightly Input screen displays only one employee at a time. After entering the pay details the user will select “Update file ” or "Next" to save the changes. Due to the nature of the Quick Edit screen (to allow ease and quick pay detail input) not all features that are available within the Fortnightly Input screen are available within the Quick Edit screen e.g. the option to enter a note on a employee's payslip.
Fortnightly Input
To use the Fortnightly Input utility, go to Process ICON no. 3 or Payslips > Fortnightly Input:
Departmental Input
If you have entered Departments then you can process by department if you wish:
Choose your department from the drop down menu on the right hand side. Only those employees allocated to the chosen department will appear in the drop down menu on the left hand side for processing.
If you Pay by the Hour
If you pay your employee(s) by the hour, then enter the hourly rate for the employee. Each period, enter the numbers of hours worked for that period within the relevant fields (Standard Hours, Time and a third, Time and a half, Double time) - the hourly rate will automatically be adjusted accordingly).
Remember that if you enter the hourly rate and the hours worked, then do not enter the amount again in the 'Fortnightly Basic' field - this will result in the number of hours multiplied by the hourly rate PLUS the fortnightly basic figure.
If you Pay by a Fortnightly Basic
If you pay your employee(s) by a basic rate then enter the basic gross wage in the Fortnightly Basic field.
Holiday Pay
If you are including holiday pay within a pay period, then enter the amount of additional pay within the 'Holiday pay' field.
Tick if sick one week (unpaid)
If an employee isn't to be paid for one full week of the fortnight (e.g. if they haven't worked/been out sick), tick the box provided. This will adjust the number of insurable weeks the employee is entitled to.
Include a Note on the Employee's Payslip
Optional - You can include a note on the individual employee’s payslip e.g. Annual pay review due 1st May or remaining annual leave entitlements etc. Enter the text in the box and the narrative will appear on the printed payslip for this employee only.
Additions
If you wish to include additions to your employee(s) salary, then within the Additions tab, select the type of Addition (taxable & non-taxable). Type the associated narrative in the relevant box on the left hand side and the amount of the addition in the box to the right hand side. The narrative and amount will be displayed separately to the basic pay details on the payslip.
Deductions
If you wish to include deductions to your employee(s) salary, then within this tab, select the type of deduction (allowable & non-allowable) and type the associated narrative in the relevant box on the left hand side and the amount of the deduction in the box to the right hand side. The narrative and amount will be displayed separately to the basic pay details on the payslip.
Illness Benefit
Illness Benefit is taxable through the RPN file. If you have an employee in receipt of Illness Benefit, you should ensure you check for updated RPN files and import them immediately when available.
Click on Update File to save the pay details entered for this period and to preview the employee’s payslip or click Next to proceed to the next employee’s input.
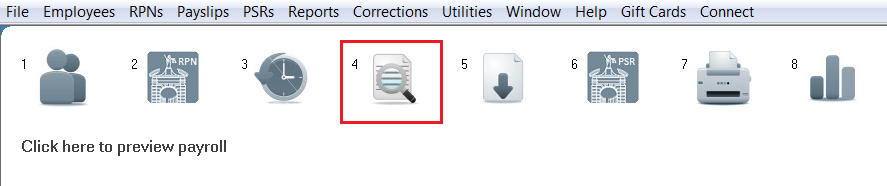
Quick Edit
To use the Quick Edit utility, go to Process ICON no. 4 or Payslips > Payroll Preview/ Quick Edit:
If you Pay by the Hour
If you pay your employee(s) by the hour then enter hourly rate for the employee. Each period, enter the numbers of hours worked for that period within the relevant fields (Standard Hours, Time and a third, Time and a half, Double time) - the hourly rate will automatically be adjusted accordingly).
Remember that if you enter the hourly rate and the hours worked, then do not enter the amount again in the 'Fortnight Basic' field - this will result in the number of hours multiplied by the hourly rate PLUS the fortnightly basic figure.
If you Pay by a Fortnightly Basic
If you pay your employee(s) by a basic rate then enter the basic gross wage in the Fortnightly Basic field.
Holiday Pay
If you are including holiday pay within a pay period then enter the amount of additional pay within the 'Holiday pay' field to be added to this period payslip.
Recording Holiday/ Leave taken when using the Quick Edit option:
You may wish to wait to record holidays taken once all employees wage details have been updated, to save exiting this menu to access another menu and repeatedly changing menu options. To record the number of holidays/leave days taken, or to view the automated holiday entitlements calculated, you can access the employee's Holiday Calculator under Employees > Holidays, Sick Leave etc. Any automated calculations are calculated on the information entered by the user to date.
Tick if sick one week (unpaid)
If an employee isn't to be paid for one full week of the fortnight (e.g. if they haven't worked/been out sick), tick the box provided. This will adjust the number of insurable weeks the employee is entitled to.
Additions/Deductions
If you wish to include additions and/or deductions to your employee(s) salary, all the additions and deductions options are shown on screen. Simply type the associated narrative in the relevant box on the left hand side, under the appropriate addition or deduction heading, and enter the amount of the addition/deduction in the box to the right hand side. The narrative and amount will be displayed separately to the basic pay details on the payslip.
Click on OK to update the employee's pay details and to return to the main employee listing to select the next employee.
Net to Gross Projection
To process a net to gross payment, go to Payslips > Net to Gross Projection: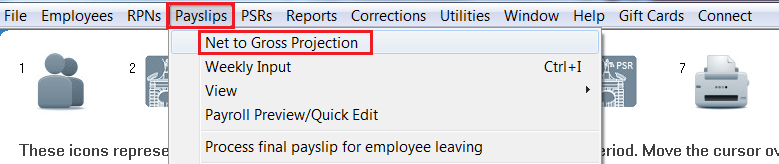
From the list of employees, simply click on the employee for whom you wish to enter the Net (Take Home) Pay figure for.
Enter Desired Take Home Pay
Once an employee has been selected, a pop up box will appear on screen, “Enter desired take home pay”. Within this field, enter the absolute take home pay figure for the employee. *This should equal the PAYMENT figure.**
The gross wage will be calculated automatically for you and displayed on screen. The user must then indicate if they wish to continue based on the figures entered and the associated automated calculations.
Additions/Deductions
If you wish to include additions and/or deductions to your employee(s) salary, all the additions and deductions options must be entered to the employee record under the menu Employees > Add/Amend Employees. Select the employee from the drop down list and click into the Additions or Deductions tab. Set up any relevant additions (taxable and non taxable) and deductions (allowable and non allowable). Simply type the associated narrative in the relevant box on the left hand side, under the appropriate addition or deduction heading, and enter the amount of the addition/deduction in the box to the right hand side. The narrative and amount will be displayed separately to the basic pay details on the payslip. Any figures entered will be applied to all future payments made to the employee until the user returns to this menu to remove the figures.
A preview of the employee’s payslip will automatically be shown on screen. Click on Close in order to proceed to the next employee for update or to return to amend the figures for the last employee. Once all employees have been updated, click on Close to exit to the menu and proceed to the next process.
Need help? Support is available at 01 8352074 or thesauruspayrollsupport@brightsg.com.